In this basic maintenance guide with video tutorials we have prepared 6 essential tips for both beginner cyclists and those who have been pedaling for a long time, so that you can take care of your bike and keep it always in top shape. These are the 6 things you should do:
- Keep your bike clean, dry and lubricated
- Check bolts, screws and all components
- Learn how to adjust your gears.
- Check tire pressure and the state of your tires
- Check your brakes
- Put on and take off the pedals
Before we begin, let us give you two warnings:
- Being your own mechanic requires some basic tools.
- Certain repairs are best left to your trusted workshop. It will cost more money, but save you time and headaches.
Keep your bike clean, dry and lubricated
It will extend the life of your components and your bike, plus you’ll save time, trouble and money in the long run.
For those who have a garden, here is a comprehensive tutorial on how to clean a bike by Calvin Jones, the flagship mechanic of the Park Tool brand:
Newbies might think: do I really need all that to clean the bike in my yard? No. Let’s cut it down to the minimum:
- Silicone gloves to protect your hands.
- Hot water with dishwashing liquid.
- Degreaser for the transmission.
- A sponge to clean the frame and wheels.
- A brush for the transmission.
- Used water containers to spray the bike and apply the degreaser with the brush.
- Used cloths, old t-shirts or paper to dry the bike.
If you do not have a garden:
- Wet wipes if the bike’s not very dirty.
- To clean and degrease the transmission, go to a car wash. Apply degreaser, leave it on, and use a high-pressure washer to wash it off.
- You can also clean the chain at home if you cover the floor and walls and use a chain cleaner. Here is a video on how to do it:
- If the bike is very dirty (mud, dirt, dust) take it to the car wash right away.
TIP: Don’t get the high-pressure washer too close to the bike as these hoses are designed for cars.
Humidity is more dangerous than dirt, so make sure to dry well the parts where there are bearings, parts that spin/rotate and bolts.
TIP: After washing the bike, grab it by the handlebar, push it upright and bounce it on the back wheel to get rid of some of the water and make drying easier.
Once the bike has dried, apply a thin layer of lubricant on the chain. Do not apply too much and, after 15 minutes, remove the excess lubricant with a piece of paper as dirt sticks easily to a greasy chain.
Check bolts, screws and all components
Checking that the bolts and screws are in good condition is critical. Make sure there is no play or loose parts, and that each bolt is tightened properly. The first tool every cyclist/mechanic should buy is a quality torque wrench, which ensures that all components are well tightened.
All components should be checked regularly to detect problems or hazardous wear and tear. The post where we explain what to look for when buying a used bike is an excellent guide to thoroughly inspect all the parts of your bike. For instance, on an indoor bike trainer the handlebar can get damaged by sweat and moisture seeping through the tape.
Check the condition of the chain to see if it needs to be replaced. A very stretched chain wears out and damages the chainrings and the cassette, and we may have to change the whole drivetrain. That means more hassle and more expenses. Here are three videos to show you how to check if your chain is OK, how to replace it and how to fix it in case it breaks:
Learn how to adjust your gears
It is actually easier than it looks, you just have to give it a try.
Here are a couple of Park Tool tutorials that explain how to adjust the front and rear derailleur, the basics of how they work and the tools needed to make the adjustment (in the video description):
Sometimes the malfunctioning of the gears is due to the poor condition of the cables or cable housings. Over time, moisture and dirt can accumulate on the end caps and inside the housings, which might keep the cable from sliding properly. Replacing them requires spare parts, experience and a few tools, so chances are it’s not worth doing it yourself; you’ll probably save yourself time and trouble by taking your bike to a workshop. Anyway, here are two videos where you can learn how to replace derailleur cables on an MTB and a road bike.
Check tire pressure and the state of your tires
It is as simple as squeezing the tires with your hands to check that the pressure is right. This way we can detect if they have lost air or if they are too hard for the terrain we are going to ride on.
To find out the exact pressure, we’ll need a track or hand pump with a pressure gauge. This allows us to adjust the pressure according to our weight, the type of bike and tire, its width, the terrain, etc. Here are some online calculators and apps to determine the ideal personalized pressure:
Advanced online tire pressure calculator
Silca app for Android and iPhone
Another application for Android
You should also check the state of the tires in case they are worn out, have cuts or any other damage. If they do, it is important to know how to remove and install a tire and tube, both to be able to replace a worn tire with a new one and to repair a puncture on route. Here is a video tutorial:
Check the brakes
Being able to stop in time is just as important as riding fast. Therefore, the brakes must be in good condition, which requires a routine check every time we clean the bike and also before embarking on a new route.
In both rim brakes and disc brakes, we must check that the brake levers activate the brakes and that they return to their position after being released and stop causing friction. If we are not pulling the brake lever and we hear the annoying sound of the brakes rubbing, we must adjust them.
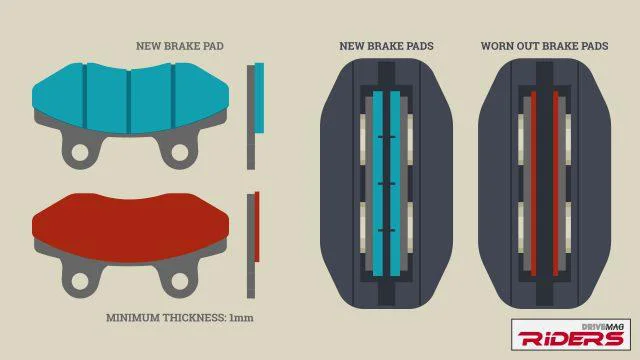
Rim brake pads and disc brake pads wear out. To find out if your rim brake pads need to be replaced, look at the line at the top of the pad or on the surface of the pad. If it is completely flat and has lost its tread pattern, the pads should be replaced.
In the case of disc brakes, you can either remove the pads to check their condition or check them without removing them to see if they are worn.

These two playlists contain a lot of video tutorials on different types of rim and disc brakes, information on how to identify them, how to change cables, oil, brake calipers, brake pads in rim or disc brakes, as well as how to install or adjust everything and the tools you’ll need:
How to remove and install bike pedals
It seems rather trivial, but there is a catch and if it is not done correctly, you can damage the crank or pedal thread. Some experienced cyclists still have to figure out which way to loosen and tighten the parts, and get the right direction by trial and error.
Some precautions must be taken in order to lever in a proper position and to avoid hitting or sticking the teeth of the chainrings in your hands or arms.
A picture is worth a thousand words, so here’s a video of Calvin Jones explaining the process, more helpful than any explanation we can give you:


