The first thing you need to know in order to choose your new MTB tires is what size and width you are currently using. To find out, follow the instructions in our basic guide to bike tires because the first indications are given by the tire you are currently using.
The most common MTB sizes are:
- 26″. It was the prevailing size until the growing popularity of the 29″ around 2010. You can find 26″ models in hypermarkets.
- 27.5″. An in-between size that emerged with the advent of the 29″. Today it is used mainly in small-sized models.
- 29″. The current leading standard.
Widths range from 1.9″ on Cross-country bikes to 5″ on fat bikes.
If you already know the size and width you’re halfway there. Now it’s time to figure out what kind of tire you’re using.
Types of MTB tires

- Clincher tires. The most common on low and low/mid-range bikes.
The system is based on a tube between the tire and the rim. When inflated through the valve, the tube presses the tire into the rim, securing the wire bead with the hook of the rim.
In clincher tires you can find two kinds: wire bead and folding bead. The main difference is the material used in the bead. The wire bead is made of steel and the folding bead is made of Kevlar. They are easy to distinguish. The wire one cannot be folded and the folding one can.

Here are their pros and cons:
Wire bead
- Pro.
- They are cheaper.
- Cons.
- Heavier.
- More complicated to install than folding ones.
Folding
- Pros.
- Lighter.
- Easy installation.
- Cons.
- They are more expensive.
- Tubeless. Standard on high-end and medium/high-end MTBs. Not all mid-range models have tubeless tires, although the rims may be tubeless-ready.
The system is the same as with the conventional tire and rim, but without the tube. To retain the air you need a specific tubeless tire, rim and valve, as well as sealing liquid to block leaks and punctures.
If you are looking for a change of tires, you will find the comparison of both types below.
Clincher vs Tubeless
- Price. Clincher tires (especially wire bead ones) are cheaper than tubeless tires.
- Total cost. Clincher tires are more economical than the tubeless system. For some terrains and modalities it can be quite the opposite.
- Weight. It depends on the tire, but comparing similar models, the tubeless system is a little lighter.
- Maintenance. Clincher tires require less maintenance than tubeless tires.
- Installation. It is easier to install a clincher tire than to install tubeless.
- Puncture repair. Tubeless tires work better for small punctures because the liquid seals them up. When it comes to large punctures (cracks, holes) it is easier to change the tube.
- Traction, control and/or comfort. Tubeless wins because it allows you to ride on very low tire pressure without the risk of getting snakebite punctures as you can see in the image below.

Clincher tires are the best option for recreational use on simple terrain.
Tubeless tires are the best choice for regular use and/or on all types of terrain.
First you should know that, although a clincher tire can be used on a tubeless rim, a tubeless tire should not be used on a conventional rim. There are some subtleties here, but we’ll leave them for another post.
We are going to go deeper into detail regarding the most common tire widths for MTBs as it is an important factor when choosing the right tire according to the modality.
Most common widths for MTB
Speaking of 29″ tires, the first thing to know is that a wider tire is heavier and slower, but it gives you more traction, more cornering grip and better braking. On the other hand, a narrower tire has less traction and grip, but is lighter, faster and more agile.

Within each discipline there is a range of widths to suit different terrains and circumstances. The greater the difficulty, the wider the tire.
- Cross Country or XC: from 1.9″ to 2.3″
- Trail / All-Mountain: from 2.3″ to 2.5″
- Enduro / Downhill: from 2.5″ to 2.6″
- Fat Bikes: from 3.7″ to 5″, although the usual range is between 4″ and 5″.
There are also 29+ or 29 Plus tires. They are even wider, between 2.6″ and 3.0″, and are mainly used in Trail, All-Mountain and Enduro.
If you are going to choose a wider size, there are two things to keep in mind:
- Make sure your MTB has enough room for a wider tire and also that you do not get slowed down by the mud build-up.
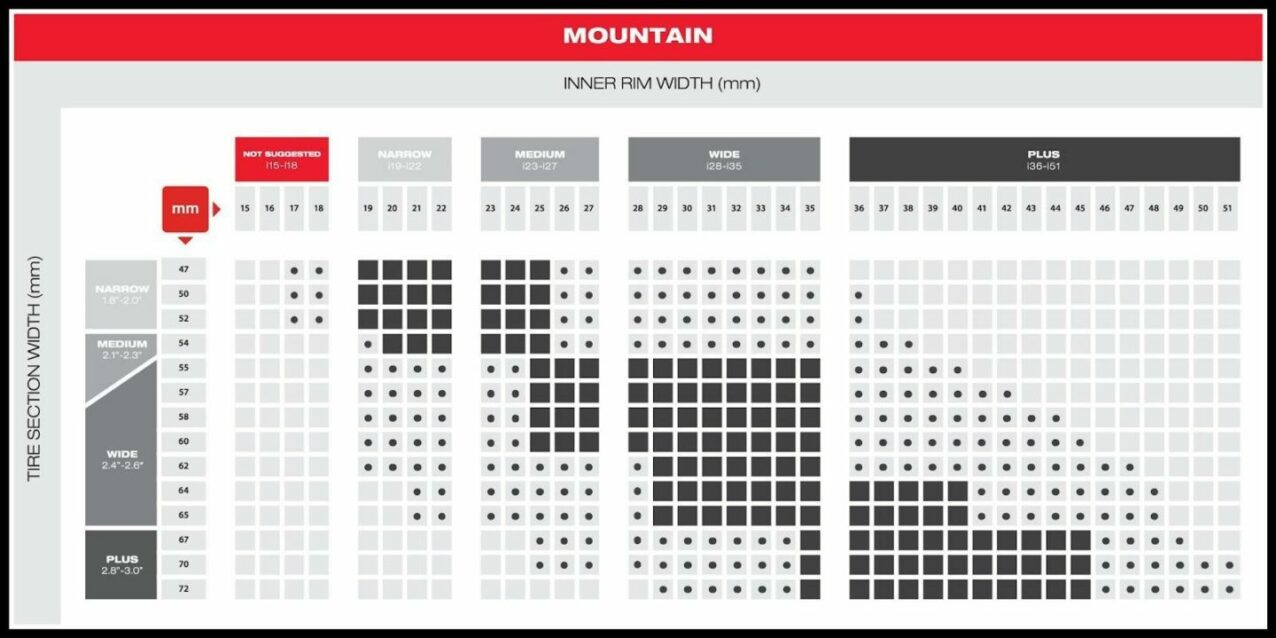
- Make sure the internal rim width is enough for the tire width you have chosen. Use the following table for guidance.
Tread + Rubber compound + TPI
The combination of infinite tread designs with multiple rubber compounds and different casing TPIs offer such a variety that there is the right tire for every terrain and modality.
Tread
The design and layout of the lugs on the tire determine the way it should be mounted . An arrow is usually used to point the direction in which the tire is to rotate. Some MTB tires have two arrows: “Front” indicating the direction for the front wheel and “Rear” for the rear wheel.

The tread is divided into three zones: center, transition and cornering.
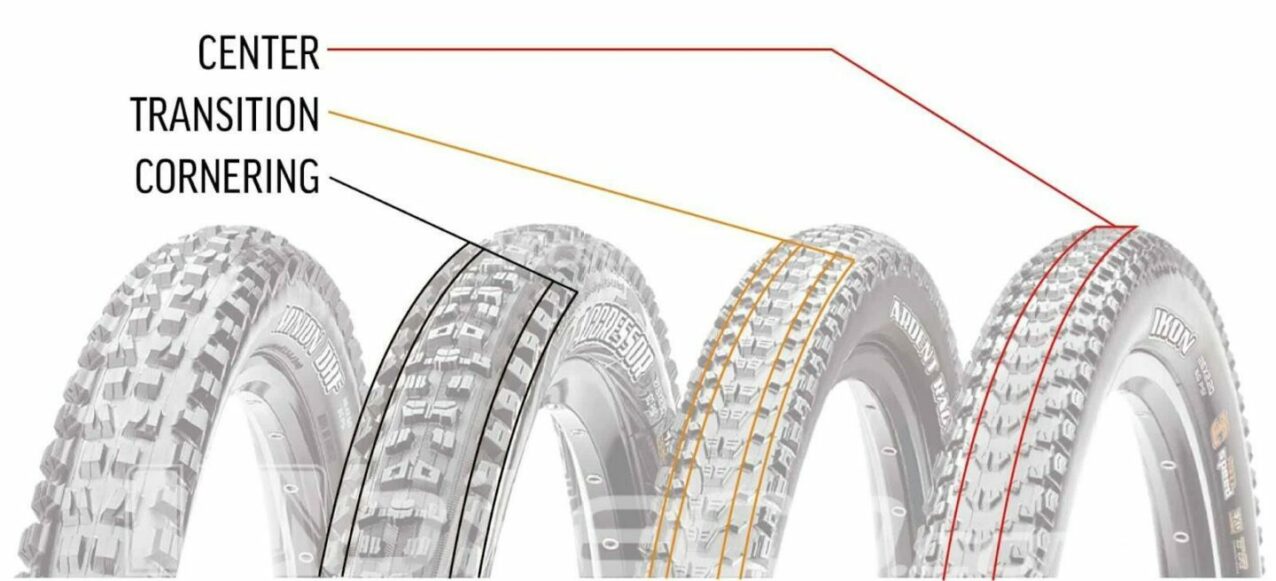
Depending on the size of the lugs, their shape, orientation, spacing and layout in the three parts of the tread, the tire will be suitable for a particular terrain and/or riding style. Here are some general guidelines:
- Dry and compact soil: Small, short and tighter lugs will help you ride fast.
- Dry and loose soil: Slightly larger lugs, wider apart and with more lugs in the transition and cornering.
- Wet and/or muddy soil: High and thick lugs. More separated in the central area than on the cornering edges to get rid of the mud and to get more traction and grip.
- Mixed soil: To ensure grip on almost any surface, they combine medium/low depth lugs spaced in the center, and higher lugs on the sides.
Many bikers use different front and rear tire widths and lug sizes. For example: A wider front tire with high-depth tread pattern on cornering for better grip and a narrower rear tire with low-depth tread pattern for more speed.
Rubber compound
The easy and simple explanation is: Hard compounds are cheaper, last longer and are faster, so they are used as a base for the entire tread and the center tread pattern. Soft compounds offer better traction than hard compounds, but last less, so they are mostly used in the cornering lugs. There is a wide variety of compounds, from the hardest to the softest ones and all that comes in between. Manufacturers combine them to offer specific tires for each discipline, terrain type and conditions, and riding style.
TPI (Threads per Inch)

The number of threads per square inch in the casing. Tires with higher thread density (more than 100-120) are more flexible and faster, but offer less protection against punctures. They are mainly used in cross country.
Lower density casings (below 60) use thicker threads and more rubber. The result is a stiffer and stronger, but slower tire. They are mostly used in enduro and downhill.
Hopefully this guide will help you get the right tire for your type of mountain bike, the way you use it, and the terrain you ride on. Switching to the right tires can completely redefine the quality of your experience, reducing punctures and/or improving feel, control, comfort, handling and, most importantly, safety.


Pingback: 10 Best Mountain Bike Tires for Sand of 2022 - MTB Rules
Pingback: Bicycle Mountain Bike Tires - eBikeAI
Pingback: Best 29 Inch Mountain Bike Tires - eBikeAI