Performing a bike fitting at home, using a set of tips from a blog post like this one, can be quite the hassle and it can have terrible consequences. Fortunately for us, in a world full of all kinds of accessible technologies, we can fit the bike ourselves, in little time and for a small amount of money. If you can’t afford a professional bike fitting or would like to try the basic steps on your own, keep reading. We’re about to list a few apps and video tutorials so you can do it yourself.
What will I need?
A measuring tape, a bike, a smartphone, a tripod or something to keep your phone in place and, for certain apps, an indoor bike trainer to firmly keep the bike in place.
Body measurements

You should start by using the tape to measure your body, including your height, inner thigh length and arm length. You will need these three simple measurements for certain apps and YouTube tutorials.
Bike fitting apps
Keep in mind that, while these apps can be very useful and some of them are quite accurate, they are no substitute for a true professional bike fit. If you’re experiencing any pain or discomfort while on the bike, or if you’re looking for a more personalized type of fitting, it’s advisable to turn directly to a professional. If you decide to rely on apps, you have several options available, either for Android, iOS or both. These are the best ones we have gathered for you:
MyVeloFit: If you’re looking for an app that gives you results as close to a biomechanical study as possible, you don’t need to keep on reading: this is the one. It was created by professionals with a specific goal, which is to make data-based bike fitting accessible and easy for everyone, so that anyone can assess their own situation and make adjustments using their own personal data.
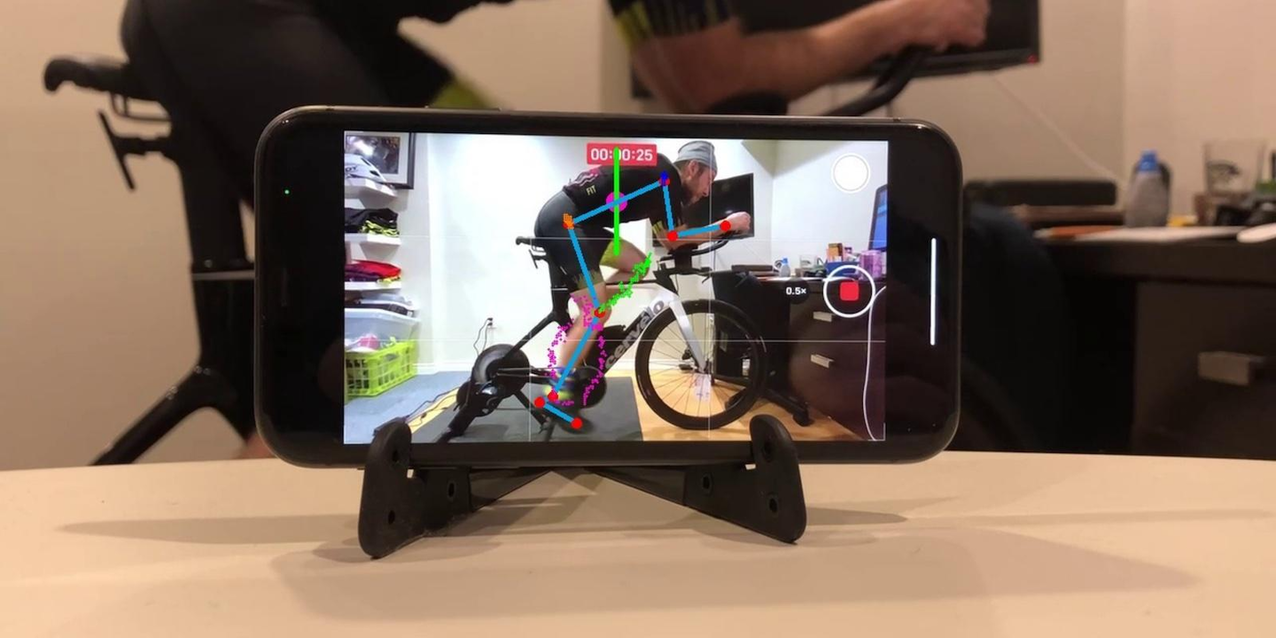
To make the most out of this app, you’ll need a bike and an indoor trainer, a camera or smartphone to record yourself, and a tripod or something to keep your phone in place.
This app will guide you along the process, starting with an assessment of your mobility and flexibility. Then, it analyzes your posture on the bike and gives you a detailed report with the adjustments needed. Once these adjustments have been made, the app proceeds to reevaluate them and repeats the whole process until it finds the bike fit that best suits your needs.
You can test it out for free with only some of its features unlocked, and if you really want to make the best out of it, you have two paid subscription plans available. For a one-time payment of $35 there’s the ‘Enthusiast’ plan, which grants you a 2-week access for one bike, but still, not all features are unlocked. For $75, there’s the ‘Pro’ plan, a yearly subscription that allows you to have multiple bikes available for fitting.
Bike Fast Fit: This app is only available for iOS systems, and it has two paid subscription plans. The basic one for $4.99 a year or $0.99 a month, with a 7-day free trial. You’ll need an indoor bike trainer and a tripod for your phone. Record yourself pedaling on the bike and upload the video onto the app for a bike, movement and posture assessment. Then, the app generates a report with all the recommended adjustments. The ‘Elite’ version provides a more thorough analysis for only $9.99, an option worth considering.

Bike Fit Calculator: This app is completely free, and only available for Android systems. It might be the simplest one here, which also implies less customization options and less thorough reports, but just enough for a basic bike fit. Choose the type of bike, enter your body and your bike measurements, and let the app do the work. Then, it’ll give you suggestions on which adjustments you could make.

Roadie Bike Fit: This app is available for $4.99 and only for Android systems. Aside from the price, the best thing is that you won’t need an indoor bike trainer to keep the bike in place, it just needs to be standing on a flat surface. Take a picture of the bike so that the app can calculate the measurements itself, and then, take a second picture of you sitting on the bike, following the app instructions. This way the measurements are taken so that the app can analyze them and suggest all the necessary adjustments.

YouTube tutorials
YouTube is such a great tool for finding tutorials on all kinds of topics, including a bike fit. You can find video tutorials from saddle height to cleats position. The key is to find a video with a trustworthy source, as well as clear and easy to follow instructions. Here’s a great example from ‘Specialized’ that goes through all the essential adjustments with clear explanations:
To see how to put the cleats in place, take a look at the following two videos:
There is so much content, and coming from so many different creators, that sometimes the amount of suggestions and methods can lead to confusion and even discomfort or injuries, as well as the feeling of having wasted your time. This is something that Chris Miller tackles on the following video, summing it all up with a sensible conclusion: A professional bike fit can be somewhat expensive, but it’s worth it not only because you save up a lot of time, but also because the advice and follow-up you get from a professional can clear up a lot of doubts.
Adjustments and follow-up
No matter if you used an app or followed a video tutorial, you have to make sure you test the bike immediately after each single adjustment, in order to check if you’re doing them right. In addition to this, you have to monitor yourself for a few days or weeks after the adjustments to follow up and see if any discomfort or pain arise. This information can help you do more precise adjustments or undo the ones you had already made.
In conclusion: Remember that a DIY bike fit can be very useful in some cases, but it shouldn’t be a replacement for a professional one. If you have specific issues with your posture on the bike or pain while riding, or if you’re looking for a more customized fitting to improve your performance, we recommend you turn to a professional biomechanic. As cyclists, that’s the best investment we can make.
